Trust nobody!
You’ve stopped paying hosting fees and are now self-hosting from home or from your workplace and as a result are feeling good about yourself. But after a few days of smooth running you examine a few log files and discover hackers around the world are bearing down on you.
Who’d have thought your insignificant operation would become a target for commercial espionage & hacking?

You’re seeing evidence of break-in attempts from Russia, China and even America. You know which countries they come from because you’ve checked source IP Addresses haven’t you? Admit it… you checked! Who’d have thought you couldn’t trust America! I guess they are the folks who elected that idiot Donald Trump as President – silly buggers!
SSH – Change Port RIGHT AWAY
If you are like me you have servers in another room or at your place of work and manage them remotely via SSH.
By default SSH listens on port 22, a popular entry point used by pesky hackers hoping your username & password are easy crack.
It is important you move SSH to another port as soon as possible as well as disable root login. That doesn’t mean you can’t do ‘root’ stuff because you can still use the ‘su’ command to switch users, although that is considered a terrible idea too. It is best to use ‘sudo’ when you need to perform elevated tasks. You should also limit the users able to access SSH by allowing only yourself.
SSH config files can be found in ‘/etc/ssh/’.
Find each of the following and modify to your liking.
PermitRootLogin no
Port {chosen port number}
AllowUsers {chosen username}
Now restart SSHD using the following command;
$ sudo systemctl restart sshd.service
Firewall & firewall-cmd
Your firewall is the first line of defence in your fight against bastard hackers. CentOS 7 no-longer uses ‘iptables’ but instead uses the smarter and better firewalld. You can still use iptables if you want to but I suggest you get used to firewalld before iptables are phased out entirely and you’re stuck with nothing.
Firewalld has zones associated with interfaces (Ethernet, Wireless, Virtual etc). The default zone is ‘public’ and each zone implies a level of trust. The following zones are available;
block dmz drop external home internal public trusted work
There are predefined Services which you can add thereby allowing traffic associated with that Service. If what you want isn’t available you can also add Ports/Protocol.
If you are running a Web Server you will need to add HTTP and/or HTTPS using the following command;
$ sudo firewall-cmd --add-service=http --add-service=https --permanent

or

$ sudo firewall-cmd --add-port=80/tcp --add-port=443/tcp --permanent
Note the ‘–permanent‘ at the end of the above command. When added that extra parameter makes changes permanent, without it modifications are temporary – good for testing. If you’re happy with your testing you can use the –runtime-to-permanent to make all temporary changes permanent.
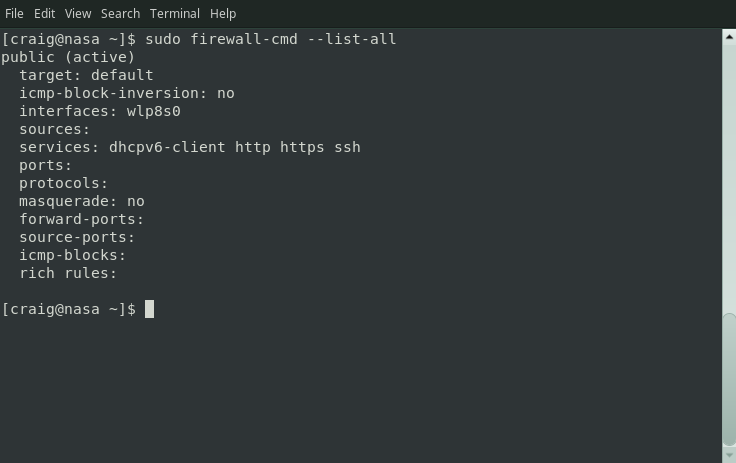
$ sudo firewall-cmd --list-all --zone=public

In the above example ‘ssh’ and ‘dhcpv6-client’ are open as well as the ports I opened in the previous example.the only ports open. Once you have added your allowed services & ports you will see those listed also.
Firewall Zone Target
Each Zone has a Target. You can see in the image in the previous paragraph the Target is Default, meaning packets received which are not addressed by a rule are REJECTED. I suggest you change the Target from Default to DROP. When a packet is rejected the server sends a response to the source IP Address effectively telling the sender “I’m here but not listening to you”, whereas, by setting Target to DROP packets are dropped with no response. From the sources point of view you don’t exist at all.
Change the Target using the following command;
# sudo firewall-cmd --set-target=DROP --permanent && sudo firewall-cmd --reload
Damned mongrel hackers
It is important you protect yourself and I’m sure you’re thinking to yourself “I wish there was a method by which I could ban IP Addresses based on the shit I see in my log files”. Your prayers have been answered – Oh bravo!
Fail2ban
Fail2ban is a log monitoring tool. It constantly scans your logs looking for predefined strings. When a match is found the offending IP Address is banned via rules added to your Firewall. The ban is temporary based on your preferred ban time. Personally I ban them for a few hours, if they become repeat offenders they are ban for an entire year.
When any banned IP Address attempts to contact the server their traffic is dropped. They get no second chances, no error messages no nothing. For them it appears I no longer exist.
Google installing fail2ban for more information. The only thing I will add to this is the commands I use to ban address and a short explanation.
First the Ban Command used by fail2ban;
actionban = firewall-cmd --zone=public --add-rich-rule='rule family="ipv4" source address="" log prefix="CUNTS " level="info" drop'
Now the Unban command;
actionunban = firewall-cmd --zone=public --remove-rich-rule='rule family="ipv4" source address="" log prefix="CUNTS " level="info" drop'
Before you moan about the ‘rude word’ used for logging, let me explain. It is short for, wait for it… wait for it… “Cretins Undermining Network Transport Services“. See, it was quite innocent and helps me identify entries in the log files via grep.
That’s it from me. I’m not an expert but have stumbled through all of the stuff above and hope something here helps someone.
Good luck.
